Keeping hardwood floors clean does not have to be complicated.
Dream homes come in many forms. There are, however, common denominators that usually pop up; in my case, as probably shared by many, one of these factors is beautiful hardwood floors. These types of floors are investments and like all other investments, they should be cared for.
Know the Deal
Take the time to inspect the wood to see how it is sealed. Wood treated with surface sealants such as polyacrylic, urethane or polyurethane are the easiest to clean because they make the wood moisture-resistant. A little sweeping of the broom, a little swishing of the mop and voila! Clean floors.
Some hardwood floors are given a dose of oil finish or penetrating seal to achieve a certain level of luster. In cases such as these, wax should be applied to the floors and then buffed to properly maintain its shine.
Varnished, lacquered and untreated hardwood floors should also be coated with a thin layer of wax. The reason for this is that hardwood floors that undergo these types of treatments are not as resistant to scuffing and moisture-related damage. The wax acts as an extra layer of protection.
Clean with Efficiency
If you have ever experienced the horrific discovery of floors ruined by splotches of white, then you would know that not all cleaners are built the same way. Hardwood floors should not be cleaned using strong chemicals such as ammonia or alkaline-based cleaning materials. These cleaning materials are abrasive! They can scratch the surface of the floor, injuring the original grains of wood.
Use cleaning materials that are formulated specifically for floors. An alternative would be to use soap and water. In our household, a cup of dishwashing soap to a bucket of water is the most effective and budget-friendly way of maintaining our floors. A tip from experience? Stay away from oil-based soaps. Oils will make the floors slippery and prone to attracting dirt.
Mop the floor as frequently as needed. Wet the mop in the cleaning solution and squeeze the excess water out. It is important that the mop is not soaking wet because excessive water can warp the floorboards. When mopping, follow the direction of the wood grains to nudge out the dirt hiding in between the fibres.
Troubleshooting Floor Issues
The reality is that short of floating above the floors, there really is no way of keeping them damage-free. Fortunately, there are easy ways to make quick repairs to restore the looks of the floors.
For example, scuffed up floors can be gently buffed by a sprinkling of baking soda on a damp sponge. Gently wipe the floor to remove scuff marks. A humidifier might help to close up small cracks that appear on the floor, because it can control the contraction and expansion of the wood.
Finally, make allowances to sand hardwood floors and recoat it with its sealant every couple of years to ensure that your hardwood floors develop character, not damage, as it ages.

Friday, October 21, 2011

Wednesday, October 19, 2011
Gordon Ramsay's guide to cookware
Do you cook frequently? If yes, do you want your cookware to have a longer life span? Let's read on! :)
Article taken off housetohome.co.uk
Gordon Ramsay's guide to cookware
Take your cookware cue from the professionals. Celebrity chef Gordon Ramsay gives housetohome his top tips on caring for cookware and keeping it looking as good as new.
Read on for Gordon's short, sweet and straight-to-the-point tips on keeping your cookware in top condition.
Match pots and pans to the hob
Stop pans overheating and becoming damaged by avoiding gas flames coming up the side of the pan. You can help prevent this by matching the size of the pan to the heating area of your hob.
Keep stirring when cooking
When adding salt to liquids in a stainless steel pan, stirring will prevent the stainless steel from pitting.
Choose the right kitchen utensils
Avoid chlorine cleansers, steel wool or sharp objects that may mark your pans - plastic, coated or wooden kitchen utensils are safest.
Allow cookware to cool after cleaning
Allow cookware to cool before placing it in cold water as this can cause it to warp.
Gordon's top cookware care tip...
Never allow cookware to boil dry.
Monday, October 17, 2011
Fun (and Functional!) Ideas for a Backsplash
Here are some recommendations to improve a basic kitchen...
Article taken off ivillage.com
Fun (and Functional!) Ideas for a Backsplash

A bright turquoise backsplash enlivens an otherwise neutral-hued kitchen.

A shiny orange backsplash pops against a sleek mix of stainless steel and white lacquer.

Mounted glass is all it takes to make a lovely, sleek backsplash.

This tiled backsplash adds character to an otherwise simple kitchen design.

A mixture of colors and materials found in the vibrant red cabinets, patterned tile backsplash and stainless-steel oven create a polished, energized kitchen.

Natural wood surfaces complement soothing pastels. The colorful backsplash combines both accent colors and gives the space a lively feel.

Translucent glass tiles create a modern and easy-to-clean backsplash.

Tall, gothic-style windows shine plenty of natural light on a cheerful checkered backsplash.

A graphic black-and-white backsplash provides pleasant contrast to cool hues.

Subway tiles are an attractive and affordable alternative to a traditional backsplash.
Thursday, October 13, 2011
15 beautiful canopy beds
What's so special about canopy beds? The four corners! =)
Article taken off ideasforhouses.com
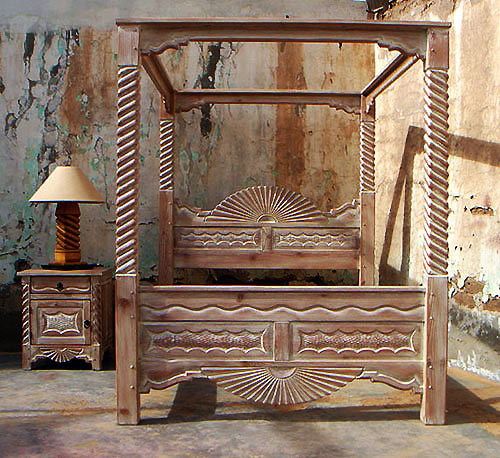
15 beautiful canopy beds
I’ve always been attracted by canopy beds. I’ve always been attracted by the idea of having one.
What do you think? What is the profile of a person who has a canopy in his bedroom?
I think a person who has something like this must be at least romantic. Since the bed is the main furniture piece in a bedroom, i think it should reflect that person’s personality. Canopy is a decorative accessory for the bedroom that evoke romance, intense love stories and…a lot of champagne.
Canopy beds represent the gateway to a whole new world. A fantasy with eyes wide open.
Technically speaking, a canopy leads to a private space. It creates the intimacy, the feeling of being protected by everything. And indeed, the main purpose of a canopy is protection. At it’s origins, the canopy was used for protecting the bed against bugs during sleep.
With time, it came out to be one of the most romantic ideas to create a romantic atmosphere. Choosing the right material, and the right bed, you can push your bedroom to be a romantic place where the magic actually happens.
If you find yourself being a person that i have described, i got for you 15 beautiful canopy beds as inspiration.


Article taken off ideasforhouses.com
15 beautiful canopy beds
I’ve always been attracted by canopy beds. I’ve always been attracted by the idea of having one.
What do you think? What is the profile of a person who has a canopy in his bedroom?
I think a person who has something like this must be at least romantic. Since the bed is the main furniture piece in a bedroom, i think it should reflect that person’s personality. Canopy is a decorative accessory for the bedroom that evoke romance, intense love stories and…a lot of champagne.
Canopy beds represent the gateway to a whole new world. A fantasy with eyes wide open.
Technically speaking, a canopy leads to a private space. It creates the intimacy, the feeling of being protected by everything. And indeed, the main purpose of a canopy is protection. At it’s origins, the canopy was used for protecting the bed against bugs during sleep.
With time, it came out to be one of the most romantic ideas to create a romantic atmosphere. Choosing the right material, and the right bed, you can push your bedroom to be a romantic place where the magic actually happens.
If you find yourself being a person that i have described, i got for you 15 beautiful canopy beds as inspiration.


Friday, October 7, 2011
How to Reupholster a Chair
Furnish your chair with a new look!
Article taken off suite101.com
How to Reupholster a Chair
Reupholstering a dining room chair
Replacing dining room chairs can be costly and time consuming. You might not be able to find a chair in the style you like or it just might be beyond your budget to buy new ones. You can update the look of your dining room, however, simply by reupholstering the chair seats.
Find a Fabric
The first step in replacing the old upholstery is to find a new fabric. It should be an upholstery grade fabric. These are thicker than others and hold up better to long-term use. Visit local fabric shops as well as larger craft stores to see a variety of options. The associates there will be able to help you determine how much fabric you will need.
When choosing the fabric, select a color or design that will fit in with the rest of the dining room's decor. Do not choose a bright orange, for instance, if the other dining room elements are pale shabby chic colors. Spend time comparing different fabric choices before making a decision.
Gather Supplies
You'll need only a few simple supplies to reupholster dining room chairs. Gather together a screwdriver, a pencil, a heavy-duty staple gun, staples, scissors, and fabric measuring tape.
Cut the Fabric
The first step is to remove the seat from the chair. Use a screwdriver to loosen and then remove the screws that attach the seat and the chair.
Lay the fabric on the floor, with the design facing down. The back or "wrong side" of the fabric will be facing up, toward you. Place the seat facing down on the fabric. The bottom of the seat will face up. Use the measuring tape to determine the length and width of the seat. Using the pencil, make a small mark one and a half inches beyond the measurements. For a seat that is 12 inches by 14 inches, for instance, you would make your marks at 13.5 inches and 15.5 inches.
Using the scissors, cut the fabric along these marks. The area you cut should create the same shape as the seat, only one and half inches larger on each side.
Staple the Fabric
Remove the extra fabric from your work area. Continue to lay the fabric face down. Place the seat face down on the fabric, as you did before, centering it in the middle. If the fabric has a design, make sure to arrange the seat so the design is properly centered.
Using the old fabric as a guide, pull the edge of the fabric neatly to the back of the seat. Follow the old fabric's pattern and staple the new fabric over it. Do this along each edge, using extra care with the corners of the seat. Pull the fabric tightly when stapling so there are no wrinkles in the fabric on the front of the seat.
Use the screws to reattach the seat and they're done. You'll have new chairs for years to come!
Monday, October 3, 2011
HGTV Dream Home 2011: Beautiful Room Pictures
Article taken off hgtv.com

Front
Warm and welcoming, the exterior front of HGTV Dream Home 2011 showcases its builder's craftsmanship and attention to detail.

Mudroom
Practicality punctuates the design of HGTV Dream Home's hardest working space. A toned-down color palette, durable flooring and floor-to-ceiling storage lockers offer style plus function.

Front Entry
A passageway from the front door to HGTV Dream Home's captivating gathering room, the front entry makes a quiet statement with minimal furnishings and a neutral color palette.

Kitchen
An oversized gourmet kitchen-cum-performance space commands attention with stainless-steel appliances, crisp white Carrera marble tile, quartz countertops and dark charcoal cabinetry.

Gathering Room
A celebration of fall foliage colors, the not-so-formal family room handles even the rowdiest crowds with stylish ultrasuede- and polyester-covered furnishings.

Annex
Blurring the line between indoors and out, the glass-enclosed observation room — a treetop getaway — provides a front-row seat to Stowe's ever-changing seasons.

Dining Room
A casual dining area capitalizes on mountain views and accommodates a large gathering with a maple table surrounded by sleek, stylish — and adjustable — leather chairs.

Master Bedroom
A private suite that faces the chin of Mount Mansfield, the master bedroom gracefully blends menswear fabrics with sleek, black furnishings and modern art.

Master Bathroom
Light tile, pine floors and neutral bathroom fixtures and accessories step back and let amazing mountain views steal the show.

Master Balcony
A private deck, furnished with durable outdoor furniture, faces the chin of Mount Mansfield and offers a great escape for the homeowner and guests.

Deck
A space ideal for entertaining guests or relaxing solo in the sun, the back deck, constructed of low-maintenance AZEK building material, offers exceptional mountain views.

Guest Bedroom
A sleek space, inspired by luxurious five-star hotel suites, accommodates overnight guests and offers privacy and a picturesque view of the mountaintops.

Guest Bathroom
A clean, crisp color palette, plush towels and luxe amenities make visitors feel right at home and pampered in this guest space.

Living Area
Inspired by the colors of Vermont in springtime, the living area accommodates a large crowd with an oversized sectional, versatile furnishings and entertainment options at the ready.

Ski Dorm
An explosion of saturated color punctuates the ski dorm color palette. The bedroom, which accommodates up to eight guests, offers both privacy and entertainment opportunities.

Ski Dorm Bathroom
Designed to accommodate a large crowd of kids, the dorm bathroom pops with a bright tomato-red countertop and ski-inspired accessories.

Laundry Room
Located on the lower level of HGTV Dream Home 2011, the laundry room accommodates families and guests with extra-large appliances and task and storage space.

Terrace
The home's slate-paved back patio doubles as an outdoor kitchen and offers enviable views of Stowe’s magnificent mountain range.

East Side
A shimmering copper chimney and masonry-clad foundation add Old-World charm to the exterior of HGTV Dream Home 2011.

Car Barn Exterior
Mountain-lodge style extends to the two-car garage, clad in poplar bark siding. Sturdy timbers, constructed on site from local hemlock, add structural support as well as aesthetic value.

Car Barn
A bright fall foliage-inspired color palette extends to the two-car garage, where a pine-sided interior and vaulted ceiling lend elegance to the oversized space.

Subscribe to:
Posts (Atom)