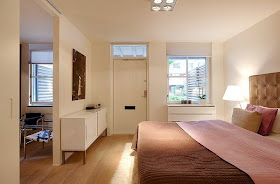
Gorgeous Scandinavian Interiors with the used of clean white as background...
Article taken off freshome.com
Modern Scandinavian Apartment That Literally Shines
We found this Scandinavian apartment that is quite different from the Swedish cribs we usually publish. With a total living area of 185 square meters, consisting of four rooms plus kitchen, you could say this crib is addressed to those used to an opulent style. The core of the loft is an open plan living room, designed in a highly contemporary manner. The white lacquer finishes make this place literally shine. The socializing zone includes a sofa, dining able and kitchen island. Splashes of color appear here and there, for creating interesting visual contrasts. A silver stag is the most striking decorating item from all the room and seems to be a statement of the luxury this home implies. The loft also features an indoor pool and a beautiful terrace for relaxation. Does the overall design of this apartment appeal to you?
Wednesday, September 28, 2011
Tuesday, September 27, 2011
Interior Lifestyle China 2011
China International Trade Fair for Household Products and Accessories
12 - 15 October 2011
Shanghai Exhibition Centre, Shanghai, China
Debut ‘Talents’ showcase at Interior Lifestyle China
‘Shine Shanghai’ features up and coming local designers
For the first time, Interior Lifestyle China will import Ambiente’s ‘Talents’ showcase from Frankfurt to the Shanghai fair. Young designers will showcase their innovative design concepts and introduce avant-guard household products from 12 – 15 October 2011 at the Shanghai Exhibition Centre.
One of the participants, Ms Anika Engelbrecht from Germany, is eager to show her “Individuals” project, which is a series of glass objects with delicate patterns ranging from glacier landscapes sandblasted into drinking glasses to fence-like holes that add new functions to a vase, to a worldwide audience. “It will be a unique experience to go to a country I have never been to before and see how they react to my designs,” said Ms Engelbrecht.
She further praised the opportunity to market to a new group of potential buyers: “I mean, it is always good to leave your "comfort zone", to get a new point of view and without platforms like ‘Talents’, all of that would not be possible.”
French designer Margaux Keller agreed. “I want to discover Chinese way of thinking, meet Chinese designers and to understand Chinese design production.” Ms Keller will present a collection of objects inspired by human behavior. Among her products are glass bottles to help finish the last drop, ceramic plates that can be licked with fingers, a wooden tray for aperitifs with ceramic bells that allows one to "take the last piece of cake" as well as other design products."
Other participants include: Mr Miguel Fiores Soeiro from Portugal, Mr Stephane Choquet from France, Mr Jimmy Chang from Taiwan as well as Mr Wenmiao, Mr Xiao Tianyu, Ms Jiangjing, Mr Chen Darui and Mr Xu Gongwei from mainland China.
There is also a special “Shine Shanghai 3” platform which groups Shanghai’s top designers from different professional backgrounds who design a theme through purely subjective and independent designing. This year' s theme "True Lies" will be interpreted by using crystal glass, which embodies both truth and lies, for it is about both innocence and maliciousness, both love and vanity, and both honor and obscurity. Among the designers involved in this showcase are Mr Hou Zhengguang, Mr Ding Wei and many others.
In addition to a number of designer driven programmes are more than 250 exhibitors from 12 countries and regions including pavilions with products made and designed in Germany, France, Italy, Japan, Hong Kong and Taiwan.
Interior Lifestyle China 2011 is organised by Messe Frankfurt (Shanghai) Ltd. To learn more about this fair, please visit www.il-china.com
For press information, please contact:
Ms Amra Durakovic
Tel (852) 2238 9972
Fax (852) 2519 6800
amra.durakovic@hongkong.messefrankfurt.com
Monday, September 26, 2011
How to Clean a Coffee Maker With Vinegar
Great uses of vinegar... =)
Article taken off homedit.com
How to Clean a Coffee Maker With Vinegar
You're sick of your coffee tasting like mud and you keep forgetting to buy those coffee cleaner solutions. Not to worry; you don't need a fancy solution to thoroughly purge your coffee maker. You can use ordinary vinegar to clean a coffee maker. A few simple steps will have you on your way to a tasty cup of coffee once again.
Instructions
1. Dump out any leftover coffee from the carafe and empty the basket of the old coffee ground and filter.
2. Rinse the carafe in cold water then fill with one part white vinegar to two parts water.
3. Pour the vinegar and water solution into the coffee maker's reservoir and turn the maker on to brew a pot. Once the brewing cycle is complete, shut off the coffee maker.
4. Allow the vinegar solution to sit in the carafe for about 15 minutes.
5. Rinse out any vestiges of vinegar by brewing water only through the coffee maker twice more, again shutting of the coffee maker and letting it cool about 15 minutes between cycles.
6. Wash the carafe and filter basket in warm, soapy water. Rinse and get ready to enjoy great-tasting coffee once again.
Article taken off homedit.com
How to Clean a Coffee Maker With Vinegar
You're sick of your coffee tasting like mud and you keep forgetting to buy those coffee cleaner solutions. Not to worry; you don't need a fancy solution to thoroughly purge your coffee maker. You can use ordinary vinegar to clean a coffee maker. A few simple steps will have you on your way to a tasty cup of coffee once again.
Instructions
1. Dump out any leftover coffee from the carafe and empty the basket of the old coffee ground and filter.
2. Rinse the carafe in cold water then fill with one part white vinegar to two parts water.
3. Pour the vinegar and water solution into the coffee maker's reservoir and turn the maker on to brew a pot. Once the brewing cycle is complete, shut off the coffee maker.
4. Allow the vinegar solution to sit in the carafe for about 15 minutes.
5. Rinse out any vestiges of vinegar by brewing water only through the coffee maker twice more, again shutting of the coffee maker and letting it cool about 15 minutes between cycles.
6. Wash the carafe and filter basket in warm, soapy water. Rinse and get ready to enjoy great-tasting coffee once again.
Friday, September 23, 2011
7 Costly Home Improvement Don'ts
Article taken off hgtv.com
Don't Ignore Safety
This goes for any home improvement project. Simple precautions like wearing safety goggles, not overloading outlets and turning off breakers will only take a few minutes or a few extra bucks, but these steps can save you from disaster.
Don't Skip the Primer
The key to a successful paint job is always prep. A coat of primer will seal the surface, provide durability and create a solid bond for the paint to adhere. The only time primer may not be needed is when painting latex over latex and the colors have a similar intensity.
Make Sure You Get a Real Pro
If you need to hire a pro make sure they are qualified for the job. Never let anyone other than a licensed electrician repair or alter the wiring in your home. The same goes for plumbing — many states also require them to have a license or state certification.
Don't Skimp on Grout Sealer
You can spend a lot of time and money installing tile, but if you don't properly seal the grout it can absorb water, dirt and other stains.
Don't Forget About the Subfloor
Laminate flooring needs an underlayment/vapor barrier for almost any surface it is being installed upon. Not only will it protect it from moisture, it will also help with soundproofing. Hardwood floors need an even subfloor, so use subfloor compound to ensure a level surface. If laying tile in a bathroom, cement backer board should be used underneath.
Make Sure to Get Necessary Building Permits
The last thing anyone wants is to spend time and effort building a beautiful deck only to find out it must be ripped up because there was no permit. Find out the rules and regulations for building permits, codes and inspections before you start any remodeling project.
Don't Get the Wrong Style Window
The wrong windows can have consequences on both the interior and exterior of the home. When choosing windows, make sure the style matches the appearance and architecture of your home's exterior. On the inside, windows will affect the light, ventilation and temperature of the home.
Monday, September 19, 2011
7 Useful Tips for Decorating a Studio Apartment
Hope that you will find these tips useful! =)
Article taken off homedit.com
7 Useful Tips for Decorating a Studio Apartment
Decorating a studio apartment can prove to be very challenging as all the things are a part of a single undivided space. All the different parts of a house such as sleeping area, cooking area, dining area, study area, and the living area coexists together and hence the decoration of the apartment is a difficult job.
Here is an extensive list of tips for decorating a studio apartment –
1.Studio apartments are known to have limited space, so in order to have efficient storage space, try to purchase furniture that performs a double duty. You can easily find ottomans and chairs with storage space. You just need to lift the top to access the storage area. You can use this space for storing your pillows, blankets and other items.
2.If your studio apartment has sufficient height, then create a loft and make it accessible by stairs. You can use this as a storage area or evolve it as a hobby or study area.
3.Create specific areas for varied activities. For instance, a bed along with the dresser can be placed at one end, and the other end can be used as kitchen and dining area and the living area can be created somewhere in the mid way. Moreover, if you are really short of space then try to use a sofa cum bed. Instead of a dresser, just mount a mirror and a shelf on a wall.
4.Try to use dividers to demarcate space but limit them to just one or two. Thin glass with slight etching or frosting is the perfect material for the divider. However, you may also select wood if you desire to create completely separate areas.
5.Make use of mirrors to reflect light. Several small mirrors or a large mirror located strategically is known to make a small space appear larger and lighter.
6.Avoid blocking the source of light. Restricting natural light to travel in by the use of draperies and blinds will make the room look crowded and small. Leave the windows completely bare or at the most dress them with sheer fabric to allow the light to come in.
7.Studio apartments should always be painted in lighter colors, unless they are really large. It is not mandatory to stick with whites and creams but using light colors such as soothing pink, yellow, blue, shall expand the space and make it look large.
Wednesday, September 14, 2011
15 New Uses for Your Hair Dryer
Read on to check out how useful a hair dryer can be!
Article taken off care2.com
15 New Uses for Your Hair Dryer
Hand held hair dryers were introduced for the domestic market in 1920, and since then countless hairdos have relied on that combination of heat and air to achieve their coiffed perfection. But the humble blow dryer has plenty of other services to offer around the house–here are a handful of them:
1. If you need to quickly set the icing on a cake, the air and heat of a hair dryer can quicken up the process.
2. If your cake won’t unstick from the cake pan, use your hair dryer on the bottom of the pan then invert it, it should drop right out.
3. Running an ice cream scoop under hot water helps, but you can also try using a hair dryer on the carton to soften ice cream for easy scooping.
4. Some people use pots of boiling water to quicken freezer defrosting, a hot hair dryer works even more quickly. (Be careful of puddles of water and the dryer, though.)
5. Automatic ice-makers can get jammed with frozen ice, relieve that with a long blast of hot air to melt unwanted icebergs.
6. Remove contact paper from shelves by heating it with the hair dryer and gently working the edges up. Also works for bumper stickers and other rogue sticky things.
7. Use a hair dryer to dust hard-to-dust items; the air will blow the dust somewhere else, but hopefully somewhere else that is easier to dust.
8. Personally, I like my kids’ crayon marks on my walls, but for the rest of you: heat the crayon marks until softened, then scrub with hot water and detergent.
9. Old photo albums with magnetic pages can get stuck–unstick them with a blast from the hair dryer.
10. Spot iron wrinkles by lightly dampening the area and then heating the wrinkles with your dryer.
11. Wet boots, shoes, and sneakers can take on a terrible odor if left to dry slowly–alleviate that by drying them with your hair dryer.
12. Winter can bring frozen windows and locks–thaw them with a hair dryer.
13. Window screens collecting dust and pollen? Blow it back to whence it came.
14. Removing bandages can hurt more than the wound, soften the adhesive with a hair dryer first to ease the rip.
15. If you have trouble keeping a hot compress hot, keep your hair dryer by you and reheat as necessary.
Monday, September 12, 2011
Practical Storage System Hidden Understairs
Organize your home with this space saving idea!
Article taken off freshome.com
Practical Storage System Hidden Understairs
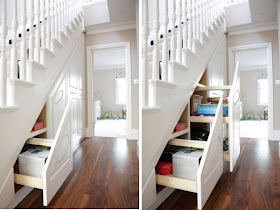
Chiswick Woodworking Company completed an interesting and highly practical project consisting of several storage units that can be pulled out from under the stairs. This idea is not new, we presented quite a few similar projects here on Freshome. However, this time the finish is so cleverly executed and the units so well hidden, that we thought we had to share it with you for inspiration. In the photos below you have four different “lockers” and each of them can be accessed individually. We also appreciate the design of the storage devices: each of them futures diverse solutions, for the smallest objects and even large boxes, clothes, shoes and so on. The pulling mechanism is simple; this way anyone can have easy access to the items inside the “stairs” (children too). How do you make the most of your under-stairs space?
Monday, September 5, 2011
11 Modern Minimalist Computer Desks
Still using PC desk at home? Take a look...
Article taken off home-designing.com
11 Modern Minimalist Computer Desks
Recently I set out to find a new desk for my PC to rest on and came across a lot of ideas that I thought were worthy enough to share. Actually the search was tough. I mean, I know there would be a lot of people out there who would be happy with huge desks that house a nook for every peripheral… (like the one below)
…but somehow they just don’t work for me. Design wise, I am more of the minimalist so naturally the ones I tend to like also favour this type of style. These minimalist computer desks we are going to feature are light weight, easy on the eyes and most of them are as sleek as the technology they are designed to hold.
OneLessDesk from Heckler Designs has a 2 deck design and takes up merely 12 inches of space when put away. The company’s pitch for the product actually sounds convincing.
At one time, you needed a desk that could fit a mountain of paper, a two-foot-deep monitor, printer, and a CPU the size of a Labrador. Today, your computer is an inch thick. You have moved forward. It’s time your desk caught up.
If you normally tend to work on a laptop, this floating Ledge desk from Urban Case might be all you need.
Milk‘s computer desk is another minimalist desk concept that is defined by clean lines and in-built compartments for hardware and fish tank!
The Airia Desk From Herman Miller is the latest example of the design giant’s genius. The desk is sleekly modernized version of a drafting table, giving you storage with style.
The Signalement Desk designed by Germany’s Peter Petersen as part of his Tank Collection, and is made entirely of medium density fiberboard and looks like something from the future.
If you are the kind who gets easily distracted, you would love the ReWrite desk by GamFratesi. The half cubicle-half egg design would help you get work done!
The iDesk is as sleek as any iMac, making it a great décor compliment to your computer.
MisoSoup Design’s K Workstation looks like a single piece of material mounted to a wall to provide a workspace, storage and overhead shelving with the aesthetic fluidity of a noodle.
The VU.VU.VU desk by Emmemobili appears to nearly levitate, while providing space for a PC, keyboard and accouterments.
The XYZ desk offers something revolutionary – it integrates the computer right into the desk.
Another computer-desk integration concept. But this Sync Desktop by Gareth Battensby allows you to fold in the monitor too.